
Pages

Showing posts with label Thingiverse. Show all posts

Sunday, 17 July 2016

Open Source Hardware: USB-A Mounting board

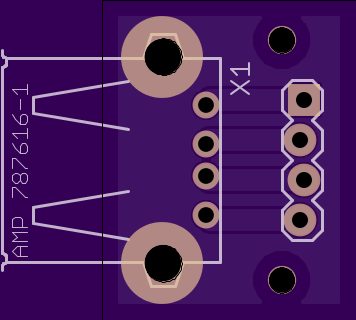
while ago I tore down an old device (Can't remember if it was an old printer or something else) and found a neat little module that you could screw onto the side of a case to hold a USB-A port securely. Many designs have the USB port mounted on the main PCB but in many cases I want a USB port some distance from the main PCB which then makes it quite hard to mount it nicely.

This board, together with a quick and easy 3D printed housing, makes it a perfect solution (in my opinion anyway ;-) I've made the PCB available on thingiverse and the PCB available on OSHPark.


Get the PCB from OSHPark:

Order from OSH Park

Get the 3D Printed part from Thingiverse:

Gineer USB-a Female receptacle Case Mount

Thursday, 17 July 2014

Easy Buble free Kapton Tape

posted 17 Jul 2014 11:41 by David Taylor

In this video I show you an easy way to stick Kapton tape onto a print surface such as aluminium. In the video I also show off the first version of the Printer plate I made available on Thingiverse.com.

PCB Heatbed MK2a Plate (3 hole mounting) (4 hole mounting)

Friday, 4 July 2014

All systems go...

posted 13 Feb 2014 12:12 by David Taylor

I had 20, 3mm aluminium plates cut last week based on the two designs I created and uploaded to thingiverse.com. I had 2 plates cut for the 3 post mounted MK2a board, for my 3D Delta Printer, and 18 of the plates for the 4 post mounted boards. The 4 post plates were destined for friends at H4H, my local hackerspace, where most people have Morgan printers, requiring the 4 post mounting system.


After wasting 2 pieces of Koptan (always thought this was Capton tape, why does everyone pronounce it like that?) I figured I'd use a trick my sister, who works in advertising, where she often has to stick vinyl signs to glass and other stuff, taught me.

I dripped a couple of drops, really just a small amount, of dishwashing liquid onto the plate, then wet it with water and gently mixed it with my fingers until the plate was evenly wet and slippery from the soap. I lay the Koptan tape onto the wet surface, which allows for really easy bubble removal, using a credit card, until the water dries up, and the tape takes over.

Here is the finished product installed on the MK2a heat bed on my 3D Delta Printer:

With all the bits finally in place I figured it was time to get some filament moving through my extruder. I had set all the values in DEFAULT_AXIS_STEPS_PER_UNIT to the same value, 167, including the extruder. Turns out the extruder needs 954 steps to push the filament 1 mm, thanks to the slightly customised Reprap pro mini extruder I now have. (A review of this coming soon). Anyway, with it all set up and ready to go, I decided to see if I could get some molten plastic squirting out of my hot-end for the first time.


And so was boren: Worm 1 and Worm 2
@Gineer Worm1 and worm2?
— Quentin Harley (@QuentinHarley) February 12, 2014


I am having slight problems with the balls not being held tightly enough to the trucks, but theoretically, I should be ready to print my first actual object soon. Just need to recalibrate with the new plates installed.

Whish me luck ;-)

First couple of printed parts

posted 9 Oct 2013 01:14 by David Taylor   [ updated 9 Oct 2013 12:44 ]

I went to House4Hack in Centurion, South Africa last night and Quentin printed 3 of these things for me.
(click to enlarge)
 
Here is a pick of 3 more in the process of creation.
(click to enlarge)

 
I also think I have managed to resolve the issue with how to mount the uprights for the towers at 45Degrees. I've designed another thing to do that, but have not asked anyone to print it for me yet. I'm trying to keep the number of 3D printed parts to a minimum until I actually have a 3D printer of my own.
 
This thing will slot into a 20x20 Bosch Rexroth Aluminium extrusion profile and slot into the slots on a 20x40 extrusion as seen in the image above. You can then secure the entire assembly by threading the center hole in the uprights and tigtening with a M6 Screw. The alternatives require more complex and precisely drilled pins to keep the allignment right. I'll post an update when I've actually been able to print and test this theory.

Thingiverse: Threaded Servo Pulley

posted 9 Oct 2013 01:01 by David Taylor

I've uploaded another thing to Thingiverse: http://www.thingiverse.com/thing:159208
 
This is a 25mm (working diameter) made to fit a Standard Nema 17 Stepper motor Shaft (5mm diameter with 4.5mm, 15mm long shaft cut-out).
This pulley should line up perfectly with the 25mm idler pulley to allow for perfectly parallel strings either side of the toper. 11mm maximum lateral travel should be fairly easy to contain. The version I uploaded to Thingiverse was made for 0.8mm string/cable so it provides a bit more margin on the sides.
As shown In the diagram above, the trucks will have a maximum vertical travel of 638mm which requires 8.12 revolutions to move the ruck through its full range. The hole for the nut to tie it to the shaft will have to be threaded though and should take M3 screws.
OpenSCAD
The other neat thing is that I initially drew the model in Sketchup. A friend of mine told me about OpenSCAD and after downloading it and familiarising myself for about 30 minutes, I was able to recreate the pulley in OpenSCAD. Awsome tool for parametric work. The OpenSCAD file is also available on thingiverse as part of the download.


I'd love to hear your comments and feedback.

Thingiverse thing: 608 Idler Pulley with Stand

posted 9 Oct 2013 01:00 by David Taylor

I published my first "thing" on thingiverse.com.
 
It is surprisingly hard to find small pulleys. The few you get do not have bearings, and are just to small.
 
a friend initially suggested that I could simply print these pulleys anyway. I then looked at using 105zz bearings but these are almost 7 times more expensive than 608zz bearings. In my original design I also needed 15 of them.
 
I bit of thinking and designing, I think I have simplified the overall design and cut the costs dramatically by designing a pulley that sits snugly over a standard 608zz bearing.


If you think you could use it, pop over to Thingiverse and print it.
Don't forget to let me know what you think or suggest any improvements.